Posted On: Monday, 16 December 2019 by Rajiv Popat

I did a talk in one of the Microsoft Events a couple of years ago where I took the audience back to basics using C# and the folks seemed to love it and gave it a five star rating. Simple things like function pointers, delegates, basic algorithms and data structures. I think everyone should recap at-least one of these topics every week and this series is my humble attempt to share what I recap with you. Today I'm recapping Bubble Sort.

Bubble Sort

Bubble sort is by far one of the simplest sorting algorithms. Let's assume that if you have 5 numbers in an array and you need to sort these numbers from low to high. Let's assume this is what the initial state of the array looks like:

InitialState

Assuming you are sorting in ascending order, the goal is to run a for loop through every element in the array, using a simple for-loop and check if the number is larger than the number next to it. If the number is larger, swap it with the number on the right.

In the above example, the for-loop begins with 5. Because 5 is larger than 4, 4 and 5 are swapped. And then you compare 5 with 3. Basically here is how every iteration of the for loop looks like:

 firstforloopexecution


Once the for loop completes you are left with:

FirstPass

One round of the for-loop execution is what we call the first pass on the array.

From the above image you can clearly see that if I do three more passes (i.e put the for-loop inside another for-loop) the array would be sorted and the right numbers would 'bubble up' to the right places. Here is what the second pass looks like:

secondforloopexecution

From the above diagram it is intuitively evident that if you do this for three more passes this is what the outcome the third pass would look like:

ThirdPass

And the fourth pass would look like this:

FourthPass

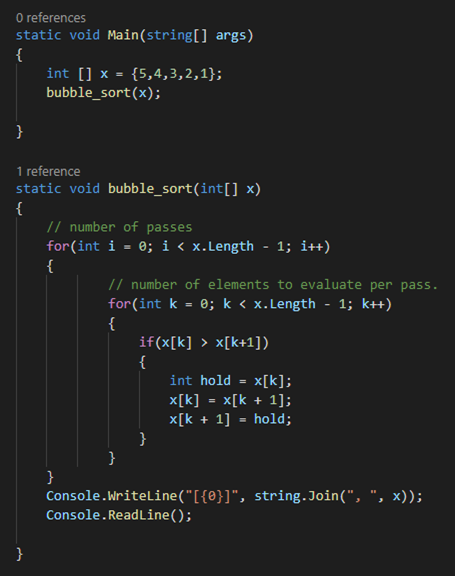
So basically if you see each pass as a for-loop and 4 (N elements i.e. Len(array) - 1) passes as another loop, we can easily translate the above logic into code:

bubblesort

In the above code, the inner for-loop is basically a single pass where we run through each element in an array and swap values if the value of the element is higher than the value it's next element. The outer for loops is number of passes.

When I wrote the example and published the blog, Steve was kind enough the point out in the comments section of this post that the algorithm wasn't fully optimized and than it was doing way more iterations than it really needed. And he is absolutely correct. In the above example we have two loops and both are iterating through the entire array. However if you notice in the above theory after the first pass, the largest number would have essentially moved to the extreme right of the array:

FirstPass

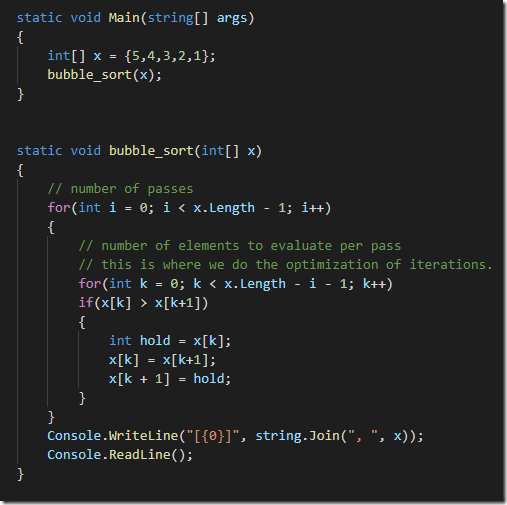
What this means is the second pass can actually ignore the last element of the array when it iterates. The third pass can ignore the last two elements and so on. This means that the second loop can essentially be further optimized and doesn't have to iterate the highest numbers which have already been moved to the extreme right of the array. The optimized version of the code looks like this:

bubblesortwithoptimizediterations

If you want a slightly different way of doing the same thing you can also look at Steve's code in the comments of this post. Special thanks to him for pointing out the optimization which I had completely forgotten, which is why revisiting these topics every now and then often helps!

Bubble sort is not super efficient when it comes to it's time complexity, and there is hardly anywhere we hand code sorting, but the algorithm itself is something that gets thrown around a lot in discussions so it's good to know what bubble sorting is all about.


Comment Section

Comments are closed.


Posted On: Thursday, 05 December 2019 by Rajiv Popat

Empathy is the foundational building block for good leadership. It makes you tolerable and worthy of forgiveness as a manager. It's a foundational building block for all relationships that you are going to form in your workplace. Steve Yegge's timeless blog post of empathy is my go-to post to read every time I find myself starting to act like a jerk.

But even as a person with empathy, you will make mistakes. These mistakes will often effect your team and make you feel like a jerk.

Time and again, a lot of managers (me included) make these same rookie mistakes. I have seen development teams suffer because of these mistakes and bad management styles. I truly believe most managers don’t have malicious intent and can fix these mistakes really easy by exercising a little bit of mindfulness.

This series of posts is my attempt to document these mistakes and try and spread some mindfulness for managers. I post them as commandments because we are wired to remember commandments and they sound just a little more serious that way.

For today's post let's start with the first mistake most managers make:

Thou Shalt Not Tell Us What We Need to Look at.

Ever worked with a manager who calls the entire team in a meeting room, points out a bunch of open items, says  "we need to start looking at this" and then ends the meeting?

weneedtostartlookingatthis

Then weeks after that meeting he calls you and gets really angry that "this" was not done?

There are multiple problems with this "we need to look at this" style of management. Here are few fundamental issues with this style of management:

#1: You never told us who amongst the team needs to look at "this".
As a manager when you aren't specific about who in your team needs to own a problem and pick it up to solve it, two things can happen:

  1. No one picks it up (and you are actually lucky if this happens) or:
  2. More than one over-ambitious pricks in the team pick it up and then step on each other’s foot all the time and get into stupid arguments because both of them have assumed ownership of the problem.

The first rule of delegation is you need to be crystal clear who you are delegating to. The second rule is you never delegate one thing to more than one person. The "we need to look at this" style of management violates both these rules of delegation.

#2: You never created any agreement on what will be done and by when.

The bigger problem with this style of management is that you never told me exactly what I need to do and by when I need to do it. "We need to look at this" doesn't mean anything. Maybe I just looked at it, realized it was bad but then I was busy, so I decided I will fix it next year.

If you want me to act, be specific about what you want me to do and by when you want me to do it. Till the time you do that you have no right to expect anything to get done and absolutely no right to ask for status.

#3: You are not paid to have visions.

The "we need to start looking at" school of managers believe that they are visionaries. Newsflash! As a manager, your job is not to have visions. It is to crystallize visions your leadership or your customers have into actionable items and enable your teams to materialize those visions.

True, every once in a while you are free to have a great idea or vision but that is not your primary job function. When you are managing a team just giving them a vision and hoping they will do the management required to materialize that vision into action is not what a manager is paid to do. A manager is supposed to manage the execution of that vision.

When you are managing a team of programmers  it's easy to see yourself in some sort of high-end leadership role where you have all the great ideas and then delegate the actual boring clerical management aspects of the execution of those ideas to the team, but that doesn't make you a great manager; it just makes you a slacker who is not doing his job.

#4: Your Job Is Helping People Stay Productive (Not confuse them).

Organizing tasks and helping people stay productive is your primary job function. Having visions and ideas is a soft skill that is nice to have. If you don't like the clerical and meticulous aspects associated with management, maybe you may want to consider taking up a specific directorial role or maybe even start your own company with your own visions. But as a manager, you are as good as your ability to give clear precise executable tasks to your team members, get impediments out of their way and keep them productive and in the flow.

Unless you are a director or the CEO of a company, the "we need to look at this" style of management is a recipe for long term disaster.

One example from the Steve Jobs book comes to mind here.

Even as CEO Steve Jobs was crystal clear about having a specific rounded edge in the windows and dialog boxes on his operating system and he made is crystal clear who would work on it and by when he wanted it.

As a CEO he could have just said, "we need to start looking at making an OS like the one we saw at xerox", packed his bag and gone home. But instead, he chose to drill down into the specifics of how his dialog boxes of that operating system would look, what the size of the mouse would be and a million other nitty-gritties. He wasn't micromanaging. He was giving direction by breaking vision into tasks and then giving people autonomy to execute the tasks.

Even if you are the CEO of your own company, you specifically need two aspects in personality, one is seeing the vision and the other that is breaking it into clear executable work items and assigning those work items to the right individuals or teams who are competent and enjoy executing them.

If you are a director, a vice president or a CEO, you might be able to get away with "we need to look at this” style of management if you have hired kickass managers who can translate that vision into an executable plan but if you are a manager or directly working with programmers, and you are expecting your team do the entire execution of your vision themselves, both you and your team are going to be disappointed, hurt and struggling to get anything done in the long term.

Always remember, when you are managing a team and you want something done, never ask your team to just "look at" something. Tell them what needs to be done, tell them who needs to do it and tell them when it needs to be done. Anything short of that is just is bad management. Anything more than that, for example, controlling how they do it, is micromanagement. Right between that bad management and micromanagement is a thin line where really effective management happens. Your job as a manager is to walk that rope.


Comment Section

Comments are closed.


Posted On: Thursday, 28 November 2019 by Rajiv Popat

Web Assemblies and the Theory Behind Blazor

Back from the days of Java applets, flash and Silverlight, companies and developers alike have always dreamt of being able to run full blown applications inside the browser.

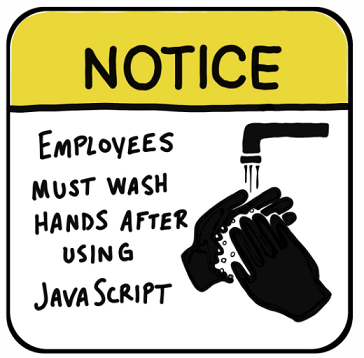
But then, most of these technologies have always been bulky, not so secure and fairly proprietary. Then as JavaScript evolved (both on the client side and the server side), true Single Page Applications became a reality. But, even today as JavaScript matures to become a ubiquitous platform for web development, most developers have a love hate relationship with JavaScript.

JavascriptLoveHateRealtionship

Enter Web Assemblies.

Web Assemblies ship with a light weight stack machine which is capable of running code that has been compiled to binary. Think of this as Byte Code for the Web. This is cool because with web assemblies you can run compiled languages like C++ inside your browser.

It’s developed in a W3C community group which tells you it's not proprietary; The community group behind web assemblies has representatives from almost all browsers.

Web Assemblies run in any browser, on any platform at almost native speed. If you want to know more about Web Assemblies you can go here.

And why are we talking about Web Assemblies in a post on Blazor? Because Blazor is .NET runtime built using Web Assemblies. This means I can now take Dotnet code and run it inside a browser.

You build .NET Apps or assemblies and ship them as Blazor Apps. The Dotnet code you write gets downloaded and runs on the Blazor runtime which is basically a web assemblies implementation. It has the ability to interact with the Dom extremely efficiently and even find out what changed in the DOM.

Alternately, you can have the same C# code run on the server and have it update the client side Dom using a Signal-R Connection. Any UI events that happen on the client side are sent to the server using Signal R. The Server captures these and runs the relevant server side code. When the server modifies the dom, Blazor calculates a diff, serializes that diff back to client and browser applies it to Dom.

Let's Try Out Blazor

Actually, Blazor has existed for sometime now; but what's interesting is that Blazor Server now ships with .NET Core 3.0 and is production ready. The ability to build completely client side apps in Blazor using Web Assembly is in still in preview through and will most likely ship in May 2020.

The tooling is seriously awesome and simple. The implementation is so neat that to pick up the basic concepts all you have to do is just generate a new project with it and the tooling stubs out a fully functional hello world sample you can learn from.

As a quick overview let's stub two Blazor Projects, one using Blazor Server and one using Web Assemblies and let's try to learn from the basic hello world examples the tooling generates. As always we'll use Visual Studio Code because it's free and let's us look under the hood to understand the tooling.

Blazor Server Example:

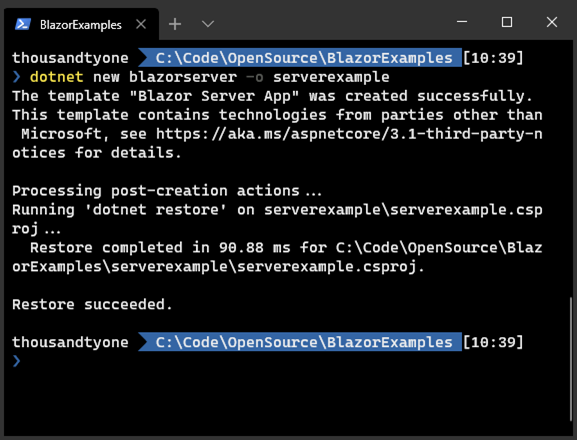
To generate a new project I fire:

dotnet new blazorserver -o serverexample
(Where serverexample happens to be the name of the project I want to stub out).

This stubs out a project for me:

BlazorServerNewProject

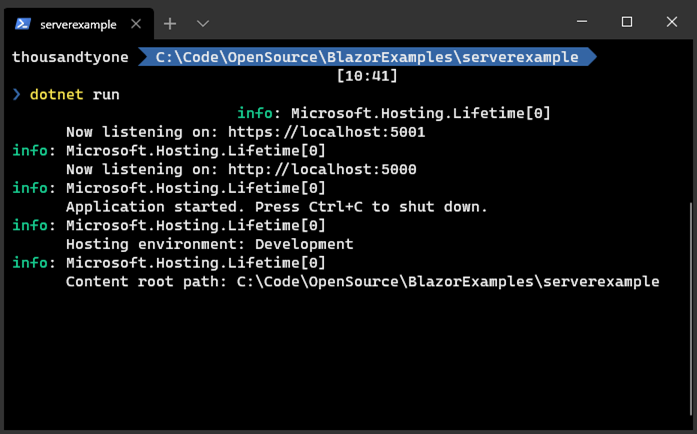
I can now simply hit "Dotnet Run" like any other Dotnet Project and the stubbed out code runs like any other web application:

BlazorServerDotnetRunning

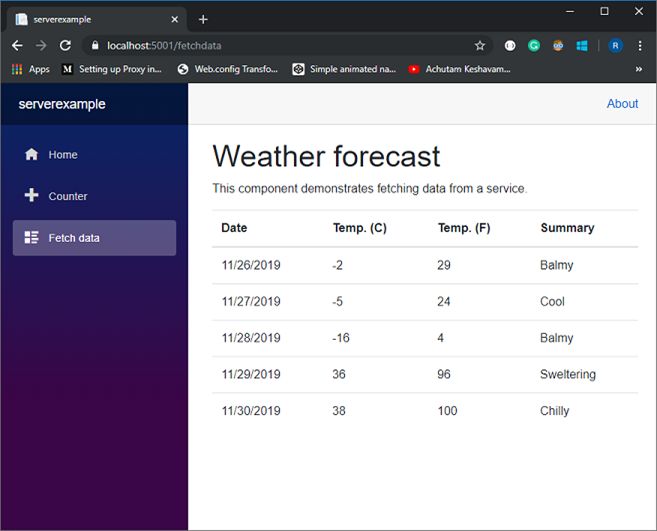
Notice that the application is running on port 5001 using HTTPs. I just hit https://localhost:5001 and then hit "Fetch Data" on the left to see an example of how data is fetched using Blazor:

FetchDataUsingServer

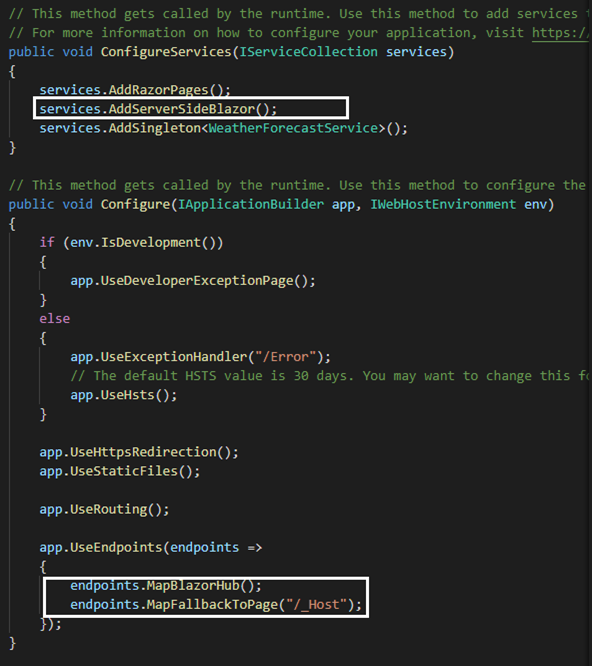
Awesome. We now have an example with Blazor Server running. Let's take a quick look at the code to see what's going on. The first thing to look at is the startup file. There are a couple of things happening here:

BlazorServerStartup

Just like we do a "UseMvc" in a typical dotnet application, here we are the Server Side Blazor service to the service pipeline. We use the new Endpoint routing that comes with .NET Core 3.0 to Map a Signal-R hub Blazor uses internally. The Fallback route of "/_Host" is theoretically supposed to be hit when no routes match. This means you can use other controllers and pages without conflicting with Blazor routes, but when none of the other routes match, the _Host route acts as a starting point for the application.

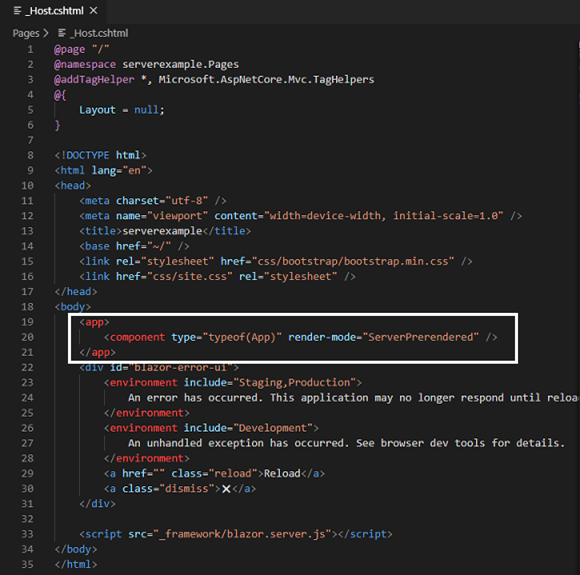
HostView

The above _Host view has two aspects. After it lays out the head and body tags, it has a section that hosts the entire app and another section to display errors. The app section itself manifests itself as a view (app.razor) of what happens when a route is found and not found:

AppView

When routes like "/FetchData" are found the corresponding views are rendered the respective View Razor files are invoked:

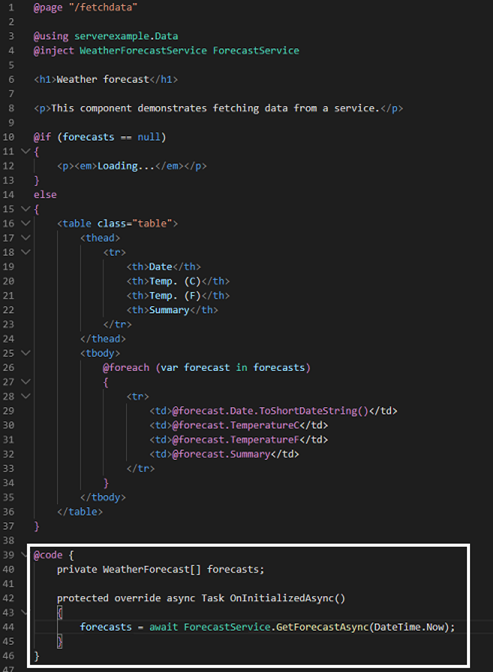
CallingServiceFromServer

Notice the HTML is similar to regular HTML and Rather other than the fact that it uses a local C# variable called forecasts which is declared in the @code block. The @block is where you write your c# code. If you don't prefer mixing HTML with C# you can actually extract this code out in a separate file which makes it very similar to the code behind model that we used with Web Forms in ASP.NET. The Forecast Service Class in the code above is just another C# class that runs on the server, which can then invoke Rest APIs and do things. In the stub is just returns hard coded data.

What's important to note here is that the C# code that write here is running on the server which means having an offline client is not possible. Also under the hood the server needs to keep a connection open using Signal-R with every connected client. Where I see this being used is small and quick prototypes or places where there is the going to be heavy use of Signal-R anyways and connection are going to be open with the server anyways all the time. A classic example is a real-time price ticker! If you need a more disconnected SPA experience you are better of moving to the client side model of Blazor.

Blazor Web Assemblies Example:

Even though this is in preview till May 2020, the tooling for building Blazor Web Assembly pages is also really awesome with .NET Core. I had to get .NET Core 3.1 (preview) for this to work though. Once I have the right version of the framework I create a new project using:

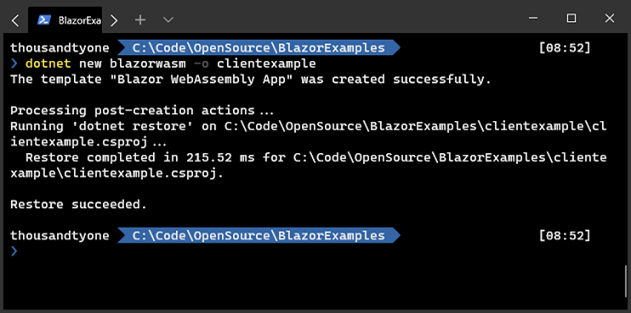
dotnet new blazorwasm -o clientexample
This stubs out a simple Web Assembly based project for me:

BlazorWebAssemblyNewProject

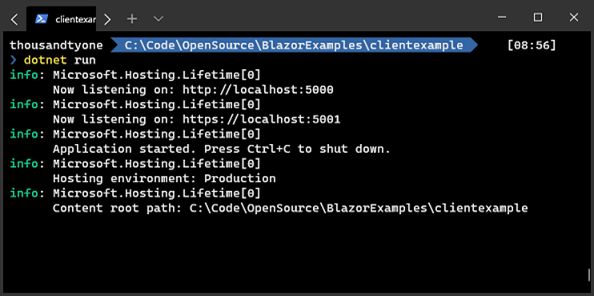
I built it and run it just like any other .NET project:

BlazorWebAssemblyDotnetRunning

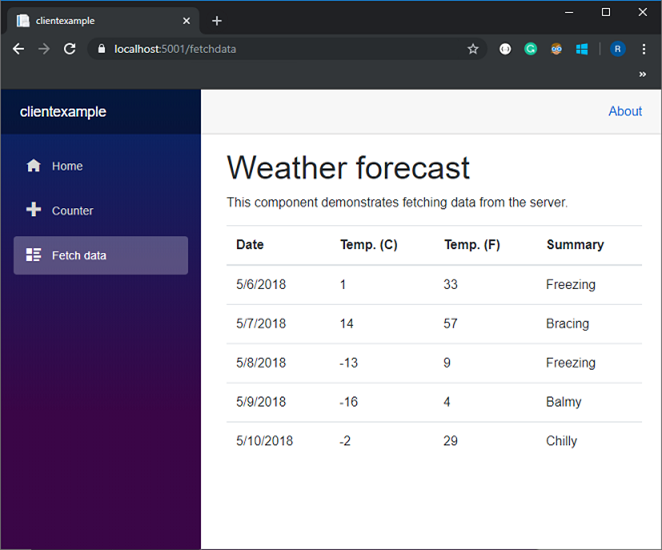
And we get:

FetchDataUsingWebAssembly

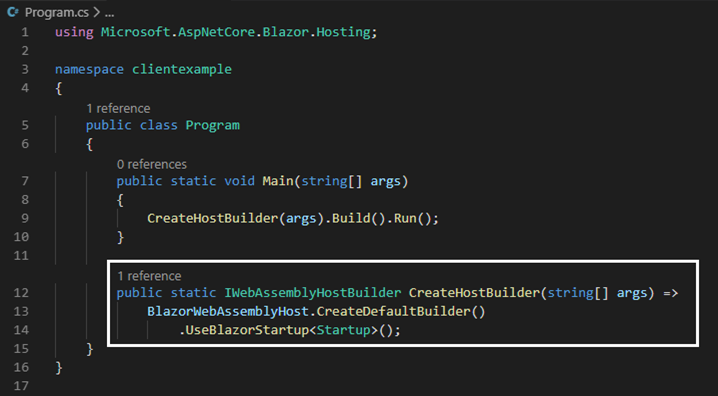
I get the exact same output as the server example we did before but the underlying tech and design that's powering this example is completely different though. Let's take a look at the code to see what's different:

BlazorWebAssemblyMain

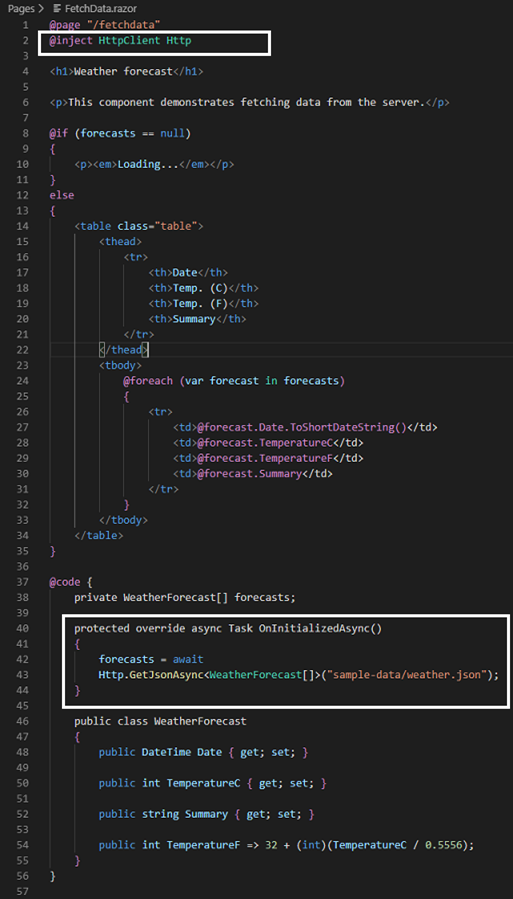
This project kicks off with a regular main method that basically utilizes the Blazor Web Assembly Host Builder to host your application. The App.razor and other aspects of your app might look similar to the server example that we tried out but what's strikingly different is the call to fetch the data:

CallingServiceFromClient


Notice above that we are using the HttpClient library of C# directly on the client side and then passing the URL of a Json file to it. This could also be a URL of a service that returns Json. There is no backend server side in this app as far as fetching data is concerned and the client is doing most of the heavy lifting.

This design is pretty similar to any angular or client side application where the .NET pieces are just being used to start and host the application. All C# code that you put in your views is directly running on your client and using Http Client libraries to hit micro services or web-api's that run on the server.

Take Away

The maturity of the tooling both on client side and the server side as far as Blazor is concerned has blown me away. All the complexity behind Web Assemblies and Signal-R are encapsulated rather elegantly by the tooling. Having said that, will I use Blazor in a production level application yet? I'm not sure.

The sever implementation of Blazor seems creepily similar to the code behind model of ASP.NET where the server has to do bulk of the processing. Unless it's a prototype or something really simple I'm building I'm not sure if I am ready to go that route.

The client side model is still in preview but that's something worth keeping your eyes on when it goes live and ready for production. Till then, back to angular and the good old JavaScript and TypeScript.

If you are a web developer, Web Assemblies are a big paradigm change and Razor is Microsoft's bet on it, which is what really makes it worth spending some time on it and seeing if it fits your problem statement.


Comment Section

Comments are closed.


Posted On: Monday, 25 November 2019 by Rajiv Popat

True Automation And Data Collection In Your Life.

Wearables and fitness trackers were virtually non-existent five years ago. The nerds amongst us were using a physical pedometer to track our steps.

pedometer

Fast forward five years and wearables are now a 25 billion dollar market. They are everywhere!
Even though most metric the wearables track hardly mean anything, wearable health trackers have at least proven that people love the idea of monitoring their health. I personally believe that automation and analytics involve more than just wearing a band and tracking your steps or even heart rate. I have talked about my fascination for automation here.

For me effective automation must satisfy  a couple of simple criteria before it can become a part of my life:

True automation is transparent.

It’s one of the biggest reasons why I don’t like wearables. If you have to check your watch five times every day to see how many steps you walked and stare at your heart rate every hour to infer your health from that, I don’t think you’re automating and tracking anything! All you are doing is losing touch with yourself and cultivating obsessions and anxiety.

That’s what the companies who make fitness trackers want you to do, just like social media companies want you to constantly engage on their platforms, your fitness tracker wants you to keep looking at it, dozens of times a day to get validation about your health and wellbeing. No wonder there are times when these devices fail and people get panic attacks.

You shouldn’t be constantly peeking at a watch or an app to get confirmation on how healthy you are. Your health is something you should be mindful of and your body should talk to you. Your health is something you should feel. You should be able to mindfully listen to your body.

Also, step count metric is a bad measure of fitness, the data you collect is hardly analyzed over long term and the automation of collecting that data using a band, is way too obtrusive.

True automation and data collection works silently. Without you even noticing it. You set it and you forget it.

Really, when the big tech giants of the world are collecting your data from your browsing history they aren’t constantly pinging and buzzing you. That is what makes their data collection so effective. It’s so silent, you don't even know it's happening.

When you work on collecting data about yourself, you need to have similar processes in place for automation and data collection. Also, not everyone needs to collect the same data either, which transitions us to our next point.

True Automation Is Personalized.

As a nerd who has run a half marathon and multiple 10k’s I understand that step count is a bad metric and means nothing. For me, the hours I spend working out is a much better metric than the number of steps I walked.

Collecting the number of steps actually messes me up! I see 16000 steps on a pedometer on most evenings and then I silently convince myself that I have done way more walking today than a regular person so I don't need to work out.

It's a lousy metric that is literally detrimental to my cardiovascular health and overall fitness. Every time I wear a band, the band convinces me that I don't need to work out and my workout sessions come down.

For me, simply counting the number of days I worked out in a month is a way better metric than my step count of every day for an entire year. The point? What matters to me, may not matter to you. True automation is personalized.

For example for me commute is a big deal. I like to hack my time and minimize the time I spend commuting to work and back. It’s such a big deal for me that I need to track and analyze that data. If you live close to your workplace and spend ten minutes walking to office, tracking commute might mean nothing for you.

Spam calls are a serious problem for me and I feel the need to automate blocking those because I literally get multiple spam calls a day. You may not be getting any and may not want to automate blocking those.

Similarly, since I moved away from the city my family lives in, the amount of time I spend talking to my parents and family back home is a big deal for me, so I track that.

Things that matter to everyone are different. Automation should be personalized and if you truly want to automate parts of your life, it's about time you put a bit of programming effort on your own customized automation, taking your own data in your own hand and pick up a few tools of automation that work for you.

In this series of posts, I plan on showcasing how I personalize my automation and share some of the tools I use with you. Every tool I use eventually collects data about my activities and the time I spend. I’ll also show you how that data then pools into a centralized database that I own myself, which brings us to our next topic.

Good Automation Doesn’t Work In Isolation

What I eat has an impact on my mood. How much time I spend on the road actually has an impact on how efficient I am at work. How much sound sleep my wife gets has an impact on how many fights we have. :) Tracking an isolated item like the number of steps or heart rate literally means nothing.

When you start bringing a bunch of these random facts in a central database suddenly you start getting insights you never had before.

If you truly want to automate and analyze your life with data, you need to design and own a database of data points from your life that matter to you.

When you own your own data sets and when you design your own automation it makes it that much more easier for you to connect things and write smarter code and analytics to make sense of your data.

And The Point Of This Series Of Posts Is?

The idea I’m trying to share with you is that you need your own personalized automation and a database of data that really matters to you. I’ll be doing a series of posts here where I talk about things I automate and track in my own life.

In this series of posts, I plan on taking you through some simple automation tools and techniques to make you more effective and help you collect and analyze data about yourself and your loved ones.

We will use a bunch of random collection techniques I use and go through some of the fun automation I’ve set up around my life.

As nerds, most of us are excited about automation, machine learning, and data science but most folks learning it don't have any real project to work on it. Why not put it to use to automate and improve your own life?

Through this series of posts, I want to learn from you more than I want to teach you. Please use my techniques and tools if you like them and go build your own automation and intelligence around what matters most to you. Please use the comments generously or drop me an email to let me know the automation you are doing.

Think of this series of posts as nothing more than a nerd mucking around and having fun with some data and some code. And in the process, I hope to learn and share something meaningful and something useful with you.

In the next post we’ll start with reducing your physic weight and using basic automation on your phone to get things that bother you out of your life. So watch out for this series of posts (or subscribe to this blog) for more on the topic of basic automation, machine learning and analytics to improve your life!


Comment Section

Comments are closed.


Posted On: Monday, 18 November 2019 by Rajiv Popat

Beautiful IDEs and Developer Productivity tools are my weakness. Which is why when PowerShell was released back in 2006, the first thing I wrote about was how you can skin it and make it look beautiful. But that was 2006. Things have changed now and Microsoft is taking the cosmetics of your terminal pretty seriously. Add to that a little bit of magic from the open source community and you can have really slick looking terminals now.

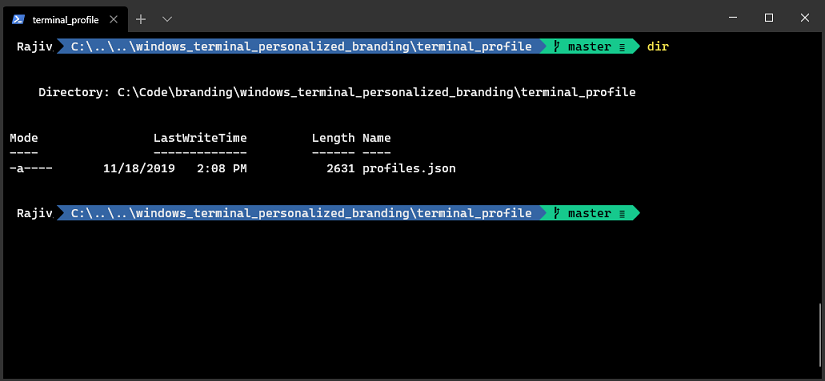
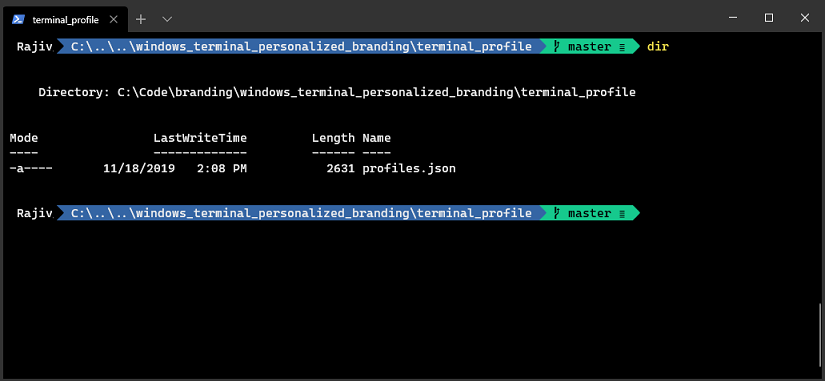
This is my diary of making my terminal beautiful on my work laptop. This is what we're trying to get to:

terminalfinaloutput

Let's start with first things first. We begin by getting the new Windows Terminal and then sprinkle a bit of open source magic on it.

Getting Windows Terminal

Windows Terminal is available in the Windows Store. You can search for "Windows Terminal" and you should see it there.

terminalwindowsstoreicon

The Repository is available here. I had a slightly older version of windows 10 available so had to upgrade it before windows store would allow me to install the terminal. Oddly enough, if you don't meet the system requirements the Microsoft Store doesn't give you any visible attention grabbing error. The download link simply doesn't work. I am just about to give up when I see the tiny "See System Requirements" link (shown in the screenshot above). I click it the Microsoft Store tells me what the issue is:

OsUpgradeError

There is an upgrade button in the store which takes me here and that link lets me upgrade my windows to the version of windows needed. After upgrading windows to the required version I'm able to download and install the Terminal from Microsoft Store. I open the terminal after installing it and  I'm presented with:

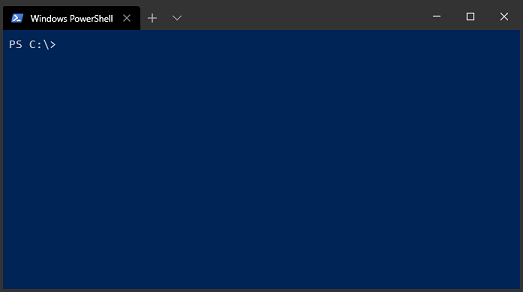
terminalscreenshot

Installing Git and Oh-My-Posh + Posh-Git Modules

Most of the times when I am in the terminal I'm working on codebases and am on git repositories, so let's make the console pretty and also make it Git aware. We begin by installing Git for windows and then move to installing Oh-My-Posh and Posh-Git modules. The following comments install both modules:

Install-Module posh-git -Scope CurrentUser
Install-Module oh-my-posh -Scope CurrentUser

Modify Your Profile Script

Once you have fired the commands above you need to modify your profile. Type "Notepad $Profile" in the terminal and that should open a blank file for you.  Add the following code into your profile:

Import-Module posh-git
Import-Module oh-my-posh
Set-Theme Agnoster

The "Agnoster" used above in one of the many other themes oh-my-posh provides you and you can pick the one that works best for you.

Installing the Right Fonts:

You need fonts that support Glyphs, without which the beautiful symbols that you see in the screenshot are nothing but ugly characters. To put things simply when people collectively agree that a bunch of character translate to a graphic we have a Glyph. Glyphs are useful because they allow you to represent a combination of characters with pretty looking symbols and icons.

You can choose from all the fonts here which already have glyphs patches inside them (or you can patch any font you like with Glyphs), but I'm just keeping it simple and using this one. From the link download "Delugia.Nerd.Font.Complete.ttf" and install it on your machine just like you would install any other font using your control panel fonts app.

Modify Your Profile settings, (JSON):

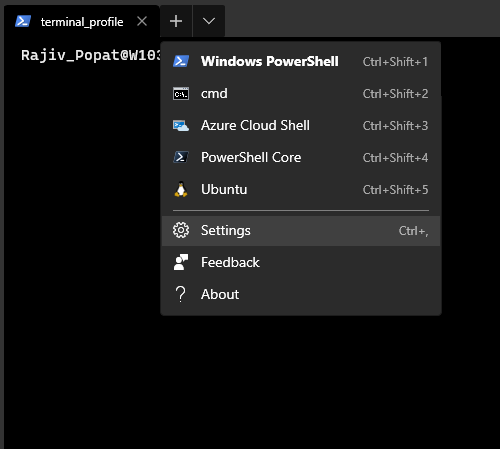
You can get you profile settings by clicking on the Down Arrow menu in the terminal and clicking on settings:

profilesettings

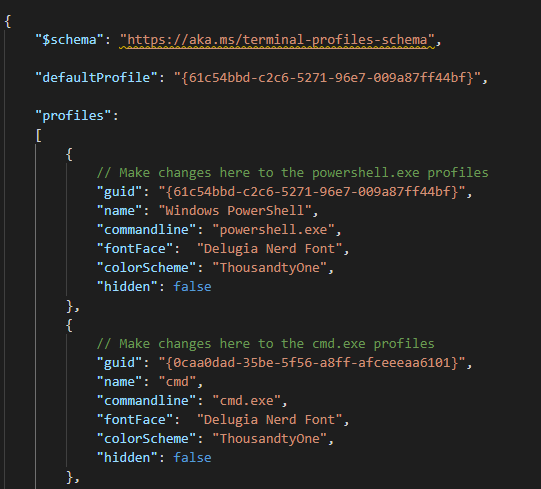
This should open up your profile file. There are a few aspects of the profile file worth understanding:

profileslist

The profile file holds a collection of profiles. The 'defaultProfile' contains the guid of the profile terminal uses by default when you launch it. Here you will notice that the guid matches the guid of the profile called "Windows PowerShell". That starts PowerShell by default every time I start the terminal. If I wanted the terminal to start the Command Prompt I can replace the defaultProfile guid with the guid of the profile called "cmd".

Now look at the profile named "Windows PowerShell" in the screenshot above. The "commandline" tells the terminal which executable it should use. The Font Face tells it which fonts to use. Delugia Nerd Font is the font we just installed in the "Installing the Right Font" section of this post and that has Glyphs oh my post and post-git need already patched into it.

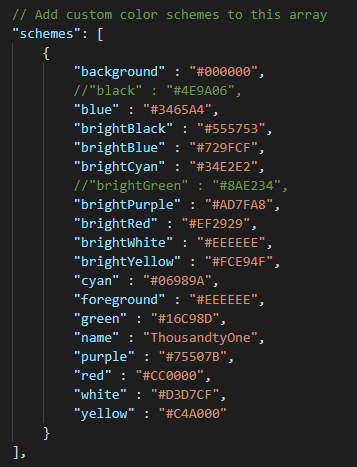
In the screenshot above I'm setting Delugia as the default font by setting the fontFace with the value 'Delugia Nerd Font'  in all my profiles. The Color Scheme tells the terminal which colors to use. In the screenshot above, My Color Scheme is called "ThousandtyOne" and this is what it looks like:

profilesettingsschemes

If you want my entire profile you can grab my profile.json from GitHub here. If you've done everything correctly start your terminal and your terminal should now look like:

terminalfinaloutput

It's good looking and the fun part is, it's git aware. Notice the Git integration above. My git strip in the prompt, when I switch into a folder that contains git repository, looks green because there are no changes. Once I make changes the strip changes orange and shows me the number of changes right there in the command line:

terminalfinaloutputgitchange

Note that all these colors are controlled by  your color themes in the profile file so if you wanted different colors you could totally change the profile file to fit your needs and customize each theme.

I do realize that as far as Windows Terminal is concerned I'm a little late to the party. Here is an awesome post from Scott Hanselman on this topic. Think of this post as just my diary of the issues I faced and a customized version of the profile I am using for myself. If you're like me and spend a bulk of your time in command line it might be a good idea to get windows terminal and work with a CLI that is a little more good looking and slightly more git aware than what you get out of the box.

Go on, make your own gorgeous terminal now and share your profile with others. Time to have some fun with your terminals people!

Note: I did face an issue with not being able to save my profile cleanly with VS Code and VS Code kept complaining about conflicts with older version of the same file. When that happened the changes I made in the profile.json are not having an impact on the terminal. That's an issue with dirty write where if you get warnings about conflicts when you save your profile.json. This link contains a solution. The idea is that every time you have a conflict saving the profile isn't enough. You have to explicitly accept the changes. The link shows you a screenshot of how you can do that.


Comment Section

Comments are closed.


Posted On: Thursday, 14 November 2019 by Rajiv Popat

Malcolm Gladwell is one of my favorite authors. If you have read Blink, Tipping Point and Outliers one thing you love about Malcolm Gladwell is that he is not a self help writer. The suggestions and tips that he provides in his books are purely a side effect of his research and not an end goal of the books he writes. Put simply Malcom Gladwell is a phycologist and a philosopher bundled inside one brain.

Talking to strangers is his book that takes his style of writing to the next level:

Talkingtostrangersbook

From the FBI failing to identify foreign spies working inside the FBI, right under their own noses, to parents failing to see their own kids being molested by their coaches and doctors, this is a book on biases and short comings of human beings and how we are really bad an analyzing people and their true intents.

This is also a book on erring on the side of good and defaulting to a position of trusting people.

If you head over to Amazon one of the biggest gripes that you see people having about this book in the review section of it's amazon listing, is that Malcolm doesn’t provide any ‘solutions’. Take this review on Amazon for instance:

Fascinating facts are revealed in typical Gladwell fashion which keeps the pace moving. But he comes terribly short on providing any sort of value for actually talking to strangers. Gladwell basically says, "Hey! We suck at talking to strangers. Here's some interesting situations that prove my point. But I have no ideas on how to be better at talking to strangers."

The review section in Amazon is littered with these kinds of comments. Looks like the readers are looking for a silver bullet or at least an assorted collection of solutions from Gladwell.

What the reviewers seem to be missing out is that, just like blink, tipping point and outliers, this is not a self help book. Malcolm Gladwell has spoilt his audience by giving them potential solutions in his past books even though the solutions proposed in his past books were always just the side effect of his research and never the end goal.

Gladwell was never trying to reach to ‘solutions’ in any of his books! Non biased, deep and not trying to hard to reach a solution, are exactly the qualities that make his books special.

And this book is no different. In fact, I would argue that this book takes his writing style to the next level.

For me, this is one of the best books written by Gladwell. He brings me face to face with our short comings to understand other human beings. We all think we know our friends, colleagues, relatives, spouse and partners.

We don’t.

In this book Malcolm brings out an important insight: if you are a good person and you err on the side of good, you are bound to make huge mistakes in understanding and talking to strangers and even people you know and love. And that is OK.

In a world where people pick up a book only to find a silver bullet or bunch of solutions that can improve or change them, this is a book that makes your brain take a pause, think hard and have a realization that maybe you are not as good at understanding people as you think you are. The book makes you mindful of your own short comings as a human being and sometimes, just having that mindfulness is the solution.

In a world where every author out there is busy giving answers, we need authors like Gladwell asking the right questions and making us think. To me this is by far one of my top ten books to read and I highly recommend you grab a copy and read it. And if you do, please login to your Amazon account and provide your reviews because most people downvoting the book seem to be missing the whole point of the book.


Comment Section

Comments are closed.


Posted On: Monday, 11 November 2019 by Rajiv Popat

GRPC has been around for quite some time but it has recently been integrated into .NET Core 3.0 and the tooling support with it is just first class now.

If you write Rest WebAPI / Microservices using .NET Core, you send JSON data over HTTP requests. The service does its work and sends a JSON response back.

Till the time your request object reaches the service it waits and doesn’t begin processing. Then it does it’s work and sends you a response back. Till your browser or client gets the response back fully there is not much the client can do and basically waits. That’s the request-response model we’ve all grown up with.

We’ve had various takes on improving this basic design in the past. GRPC is Google’s take on solving the problem of making RPC calls and leveraging data streams compared to the standard request response model.

Without going into too much theory, GRPC uses Google’s Protocol buffers to generate code which then sends data using specialized streams which happens to be really fast and as the name suggests, allows streaming of both request and response objects.

Streams are better because you can use the data as it comes in. A crude example? Instead of downloading the whole video when you stream a video you can watch the video as it downloads. GRPC uses the same approach for data. If this doesn’t make sense, read on and by the time you’ve mucked around a bit with the code, it will all start making sense.

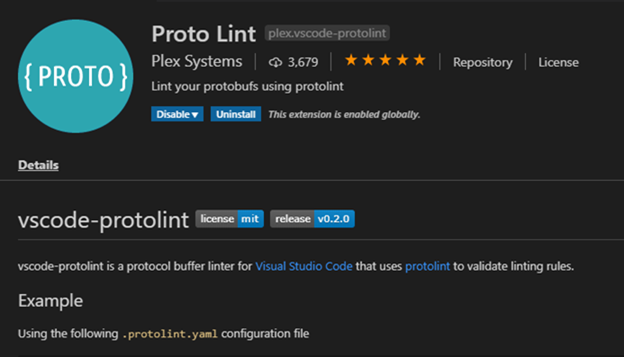
For this example we’ll use visual studio code. The tooling is much simpler with Visual Studio 2019 but I prefer to use Visual Studio Code as an IDE of choice because it shows me what’s going on under the hood. With visual studio code, I use following plugin for getting proto file syntax highlighting and support directly inside my IDE:

For syntax highlighting you can also use additional plugins like this one:

protoplugin2

I have .NET Core 3 installed on my machine. 

The first thing I do is:

  1. Generate a server project: This is like your Web API that is going to be consumed by the client.
  2. Generate the client project: This is your client that is going to consume the server and get the data by invoking an endpoint/method on the server.

I generate the server-side project using:

grpcserver

The -o specifies the output path and creates a folder called 'server' where the GRPC service is generated.

I reference the following nugets by hopping into the terminal of VS Code:

Dotnet add package GRPC.Net.Client
Dotnet add package Google.Protobuf
Dotnet add package Grpc.Tools

Here are the repositories of these three nugets if you want to know more about them:

GRPC.NET Client.

Google Protocol Buffers

GRPC Tooling. 

Once I've stubbed the code out and added the necessary packages to the project. I build the server using:

Dotnet Build

And then I open the code with VS Code.

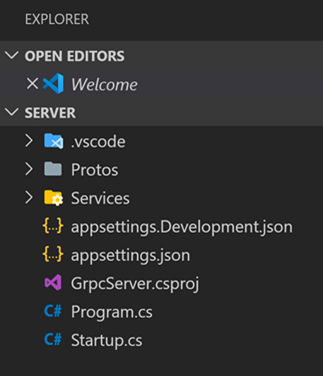
grpcprojectserverstructure

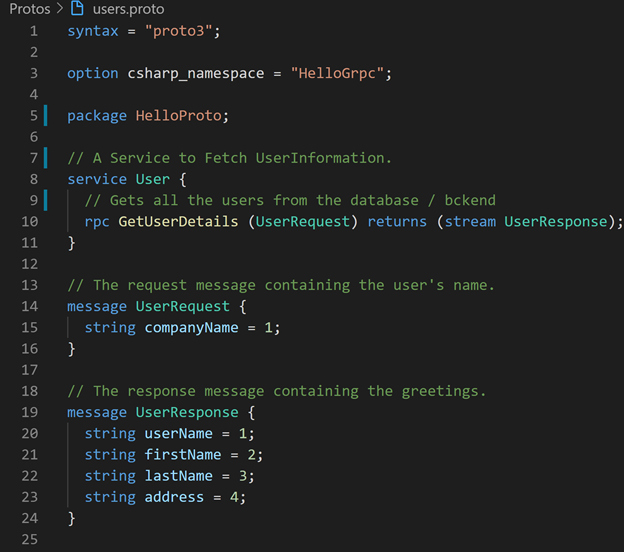
Notice the Protos folder? That has the proto files .NET tooling generated for us. Think of the proto files like your WSDL files if you come from a web service world. Proto files are specifications for your service. You write them by hand. You primarily use them to describe your request objects, response objects and your methods. Here is the example of the proto file that I wrote:

protofile

The above proto file basically says:

  1. I have a request object with the “companyName” attribute that is ordered 1 in the list of attributes. This is the request object because I will be passing the company name whose users I want to fetch.
  2. I have a response object with these attributes: userName, firstName, lastName and address. The numbers next to them is the order in which these attributes will be serialized.
  3. I have a method that takes a company name and streams back the list of users to the client. This is indicated by: “rpc GetUserDetails (UserRequest) returns (stream UserResponse);” line of code that you see in the above screenshot.
    The GetUserDetails it the method that accepts a user request and returns a stream of UserResponse. (By default, a stream would be an array of objects that would be streamed to the client).

Every time I add a .proto file I add it to the servers project (.csproj) file:

serverprotofile

Once I’ve done that, I fire the build and Google Tooling nugets generates the c# files for me in the background to actually generate the real request and response classes. With Visual Studio 2019 this tooling is hidden under the hood. With VS code the tooling fires when you build your project using the “Dotnet build” command.

Once I have the stubs I can write the service. In the service, I fetch some hard-coded values from a function. Typically, I would do this fetching from a database/service but for now, let’s keep this simple and focus on GRPC.

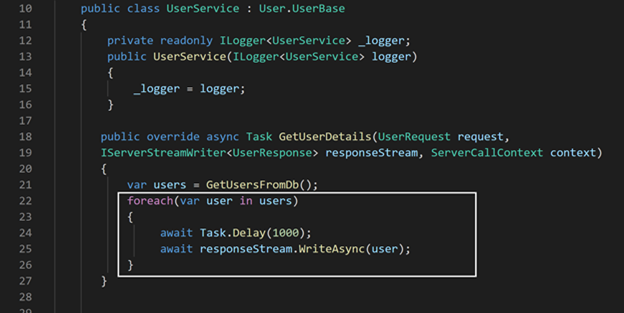
Once I fetch the data I just push the data back to the client but instead of sending the data in a response object that is pushed to the client all at once and waiting for the client to "download" the response, I use GRPC to stream the data one user at a time back to the client:

grpcserveractualservice

Typically, I would have just returned the users I get from GetUserFromDb back to the client but that would generate a regular response and I want to stream the users back to the client so I write them asynchronously to the response stream. Also notice the Task.Delay? I do that to simulate any delays that might actually be happening on the server as you process and return each user. This shows that each user that is processed is streamed back to the client even as the server continues it’s processing with additional users.

Each user that I write to the stream now flows back to the client and the client can start doing whatever it wants to do with it rather than waiting for the whole response to complete.

On the client-side, I write a simple .NET Console Application that makes a call to the server. The only thing the client needs to generate code to call the server is a copy of the proto files which contains the specs for the entire service. You would send your proto files to your clients or publish them somewhere.

I copy the same proto files on the client side and include them in my client project as “Client” files. Here is how I modify the project (.csproj) file:

clientsideprojectfile

I modify my client project to include a copy of the same .proto files and then I can fire a build. This generates all the stubs I need on the client-side to call the server.

Once this is done I start writing the client.

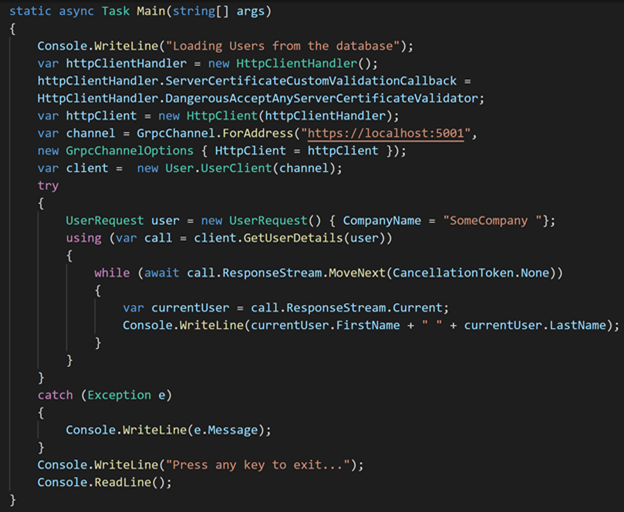
clientsidecode

Notice how I am using the Dangerous Accept Any Server Side Certificate Validator in the code above? That’s just for non-production because I am running this without any valid SSL certificate. In your production you would get a real certificate.

See how I am using the while loop to iterate through the response stream? This allows me to get each user from the stream as the server writes to the stream. And once I get the current item from the stream? Well, I am just showing each user on the console as soon as the server processes the user and writes the user object to the stream.

Now when I run the client the client calls the server, starts listening to the stream for response and starts dealing with partial responses as and when these are streamed by the server.

finaloutput

This is cool, because:

  1. The response is streamed over a channel that is much more optimized compared to JSON data being sent over HTTP using Rest. There are posts that seem to suggest that GRPC is 7x to 10x faster than JSON over rest.
  2. I can do the same streaming I did on the response object while receiving data, even when I send data using the request object. So, if you want to send huge data to the server but don't want to wait till the entire data is sent before the server starts processing it, GRPC works for that too. Put simply, it supports two-way streaming.

The post is long, but the actual implementation is tiny and super simple. If you’ve not tried GRPC before I highly recommend downloading the entire sample project I described in this post from here (it’s listed under the HelloGrpc folder) and running the server first and then the client and mucking around with the code.

Given the level at which Visual Studio Code and Visual Studio tooling for GRPC is right now, I personally think it’s really easy to pick up and most Web API developers will benefit from having this additional arrow in their quiver.

If you are a web developer who writes APIs and who cares about performance and payloads, you should care about newer better ways of communication between servers and clients compared to the traditional rest based WebAPIs that send data over JSON.

We moved from XML to JSON because the payloads were smaller in JSON. GRPC is the natural next step for smaller payloads, better compression and two way streaming of data.

Go on, give it a try. It’s super easy and well worth the few minutes you will invest in learning it. Chances are you can put it to good use right away and see huge gains in performance and end-user experience.


Comment Section

Comments are closed.


Posted On: Wednesday, 21 August 2019 by Rajiv Popat

My wife and I are not into television and have not had a television for a very long time. A couple of months we bought our first new television in five years.

Both my wife and I were not sure how much time we would actually spend in front of it and hence the decision to go Froogle. That and I wanted to be able to control my devices and something like a Raspberry Pi is much more customizable than a locked down android television. We settled for a regular, not smart Vu TV and then build our own media center using a Raspberry Pi.

The TV is a 49 inch Grade A+ panel. So the display hardware is not Ultra-HD but on the Full HD side it is as good as it gets. Pretty nice and does what we need it to at a price that's almost half that of a Sony. Very soon we run into a couple of bumps:

My TV is Shocking Me! Strange Electric Shock on the Television Frame:

I initially start with the assumption that this is an issue with my earthing and call an electrician who tells me that my earthing is just fine and the TV is flawed. He asks me to file a request with Vu and walks out.

I look up the forum and discover there are even more expensive TVs out there that have the same issue. I call up support and they replace the TV but the new one has the same issue. This time around they can give me a refund but aren't willing to help with fixing the issue.

Frustrated I end up deciding to put some basic electronics they teach you in class eight to use. The idea is that the TV missing grounding unit that would connect the current flowing with the grounding socket inside the TV but we can do that externally without even opening the TV.

So let's buy a 50 cent copper wire from a local electric shop. Next, we find a spot on the TV that has electric current running through it. In other words, the area that shocks you. You can test this with a regular tester. We tie one end of the copper wire to the frame that has the shock and screw it up securely behind a screw that holds the TV mount.

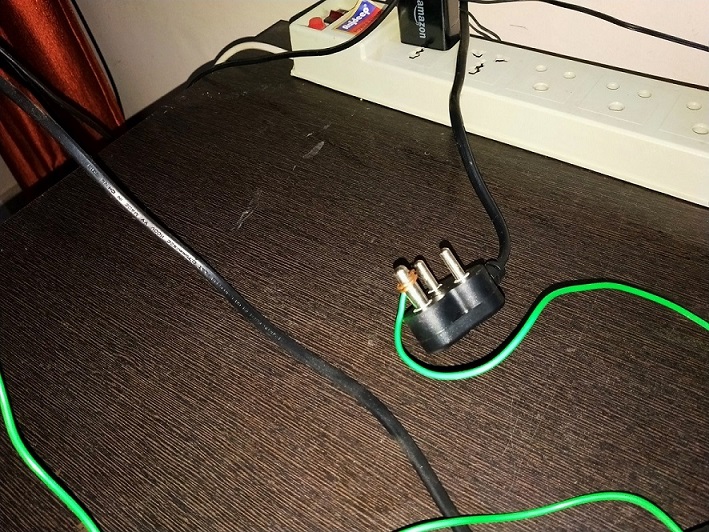
The other end goes to the earth pin. The  basic idea here is that since the TV does not provide for any grounding or earthing we earth the current running externally on the TV frame directly to the earth pin of the 3 point socket. This works for countries that support 3 pins and the 3rd pin is for grounding.

With the earth pin wound with the copper wire you ensure that any current running through the frame of the television runs through the copper wire, grounding pin and is eventually earthed effectively ensuring you don't get shocked which you touch the TV frame.

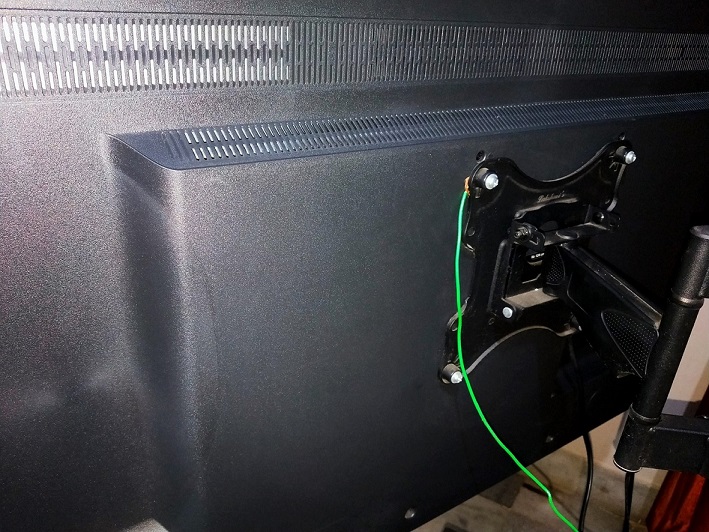
That actually works. I touch the TV and no more shocks. I guess Vu is skimping money by not grounding their circuits, but a 50 cent copper wire fixes that. We now have a really simple home made earthing on the TV frame. No more shocks. And the end product looks pretty elegant with the copper wire concealed behind the TV:

The overall result looks pretty neat and you can barely see the copper wire running from the back of the TV frame to the earth socket. Yes, the Pi and the Firestick and all those wires still need to be organized and concealed but the copper wire itself is that tiny green bit you see in the picture. Nothing objectionable.

I've seen a bunch of articles out there about TVs and monitors shocking people but no solution as such and I hope this helps someone who has a similar problem in future. It's simple class eight electronics you might have learned in your physics class put to some basic use.

Strange Skin Tone

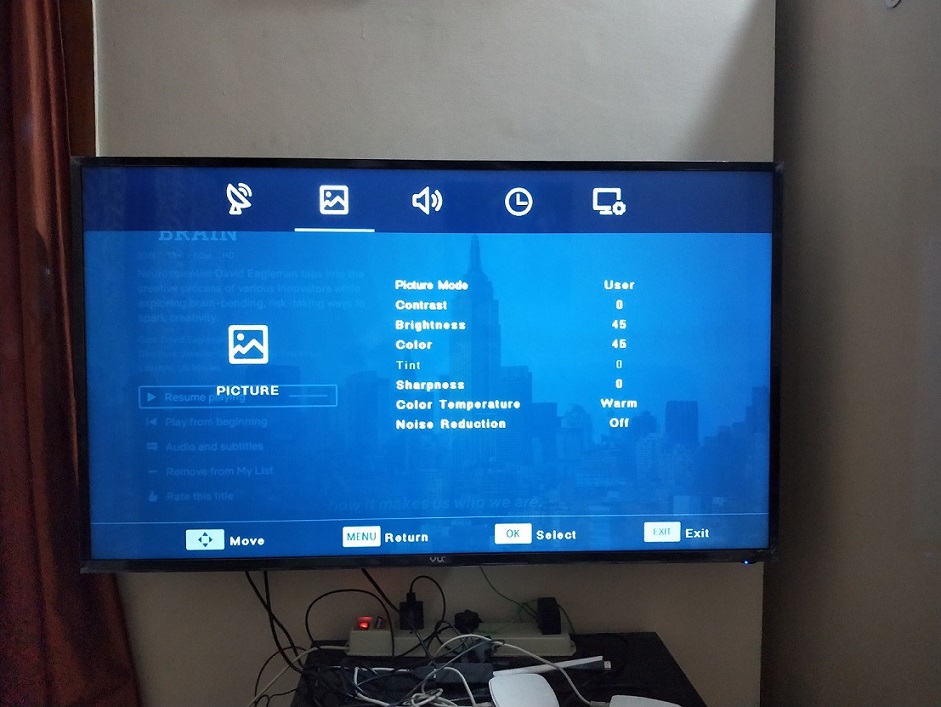
The other day my wife and I were watching a stand-up comedy show and the skin tone of characters seems a little… artificial. Turns out this setting is controlled by something called 'Tint' in most TVs and the default Vu settings don't allow end-users to modify tint settings. The tint option is disabled by default, which means you can't change the setting:

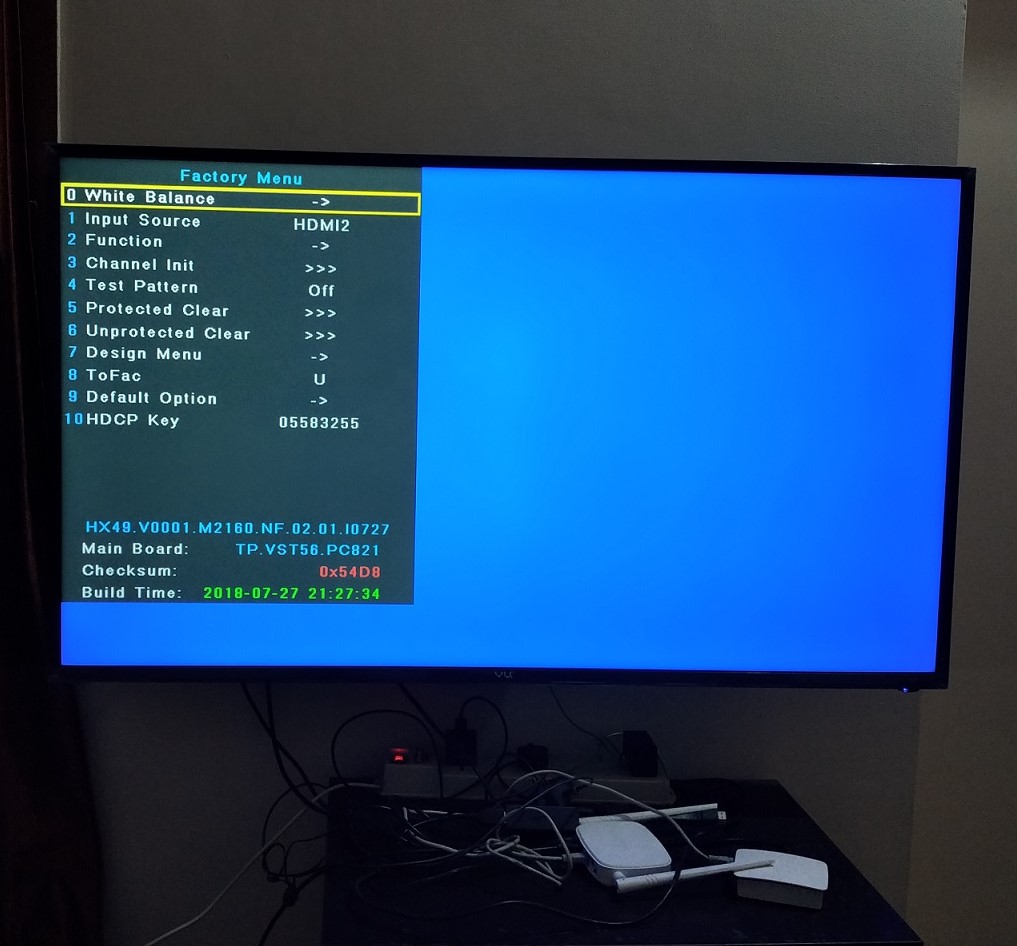
When I first see the setting, I realize it's bumped up all the way to 100 and no way to lower it. I wear my nerd glasses and hop on to a special hidden service menu most Vu TV's provide which can be reached by going to the sound setting menu, clicking on sound balance and then typing 1969 on the number pad in your remote. For some reason the folks at Vu like the year on the moon mission and have picked that to open up secret service menus on the TV:

Notice that this mode is pretty powerful and pretty much allows you to control most tiny aspects of the TV a regular user may not even care about.

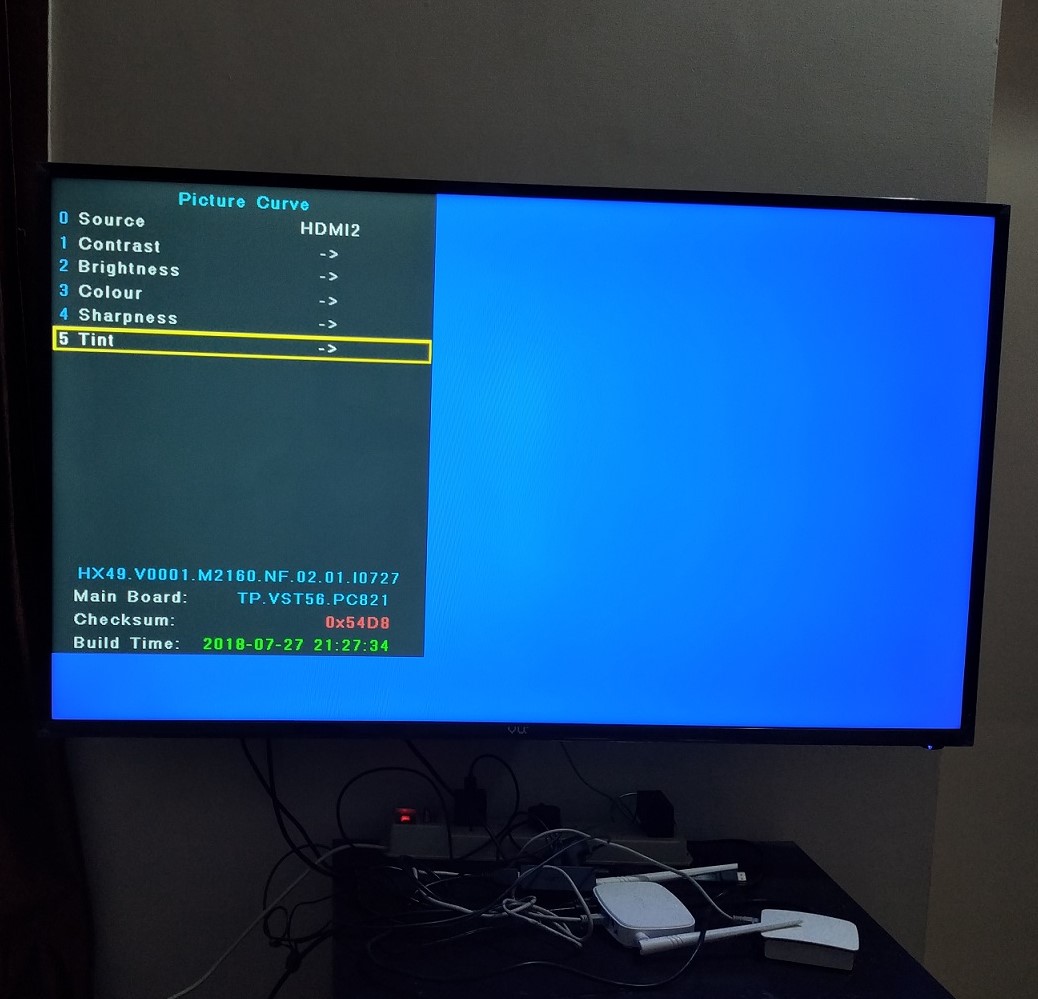
Once in, you can tell the TV to not use any special intelligence for skin tones by turning off the tint setting (which you are completely allowed to do in this secretly hidden service menu):

I turn the tint down to zero using the special service menu and the problem is gone.

The Backlight is still way too strong:

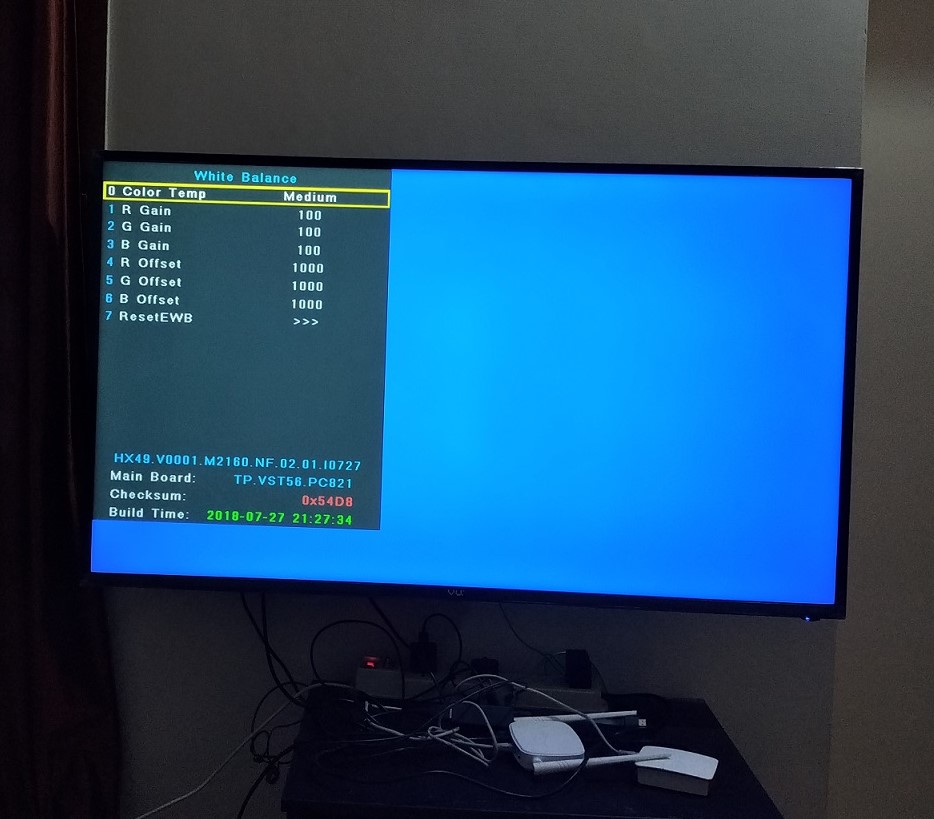
The backlight of the TV is still too strong and hurts my eyes. Vu doesn't give any option to change that. Even the service menu doesn't have any backlight settings. I panic and think of returning the TV.  But then service menu allows me to change the RGB gain on the LEDs which are all bumped up to 100 by default:

I realize if I bring those down proportionately I can control backlight of my panel. I do just that. The backlight goes much smoother and the strain on my eyes is gone.

Sorted.

The AI Is A Little Too Smart.

AI is the new thing and most TV's want to run the race of adding AI to their picture rendering. Companies like Vu however mostly do a mediocre job at it. The good part is they let you turn this off by disabling noise reduction setting to off.

Much better.

Love-Hate Relationship With My TV

At this moment I have a love-hate relationship with my TV. I love gadgets which I can customize and root into. Most phones I've owned thus far, are rooted. The service menu of Vu essentially gives me root access to the TV and is very powerful. I dig that about the TV.

The fact that I can hack into my TV and have complete control over my TV makes me feel powerful.

The fact that Vu doesn't handle this little gripes out of the box and expects end users to wear their nerd glasses on to fix these issues make me a little annoyed. Meh!

Either way, all my problems with my TV are sorted and I have a two year extended warranty during which I can return the TV if I face any additional issues. So for now, this will have to do.

If you are thinking of buying a Vu TV - here is my honest advice: Buy it only if you are willing to wear your nerd glasses on and do a little bit of tinkering with the TV, both on the hardware and software front. If you are expecting it to work out of the box like a flawless appliance, Vu isn't for you.

Having said that, the TV is a Froogle choice and once you've made the modifications you feel really happy about spending half the money than what you would have spent of other TVs and getting similar picture quality and overall experience.

Couple the dumb TV up with a Firestick TV (which I bought at discount on Amazon) and a Raspberry Pi 3b+ (bought locally) and you'll have a full-blown smart TV with a pretty decent media center, but that's a whole new post in itself.

Being a Nerd Helps.

This post was just about my gripes and issues with Vu TV and how to fix those. If you own a Vu (or any other TV) and are facing similar issues (particularly electric current running through the TV frame), feel free to use some of these fixes and let me know how it goes.

If your TV just works fine, you can still take solace in the fact that even though most of what you buy or download online today is broken it can be fixed with a little bit of tinkering and geeking.

There is value in being a nerd today. You can stop feeling bad about being a geek. Being a geek is no longer a curse. In today's world it is actually a blessing.

Now go fix something that's broken.


Comment Section

Comments are closed.