If you’re interested in and working with Javascript frameworks, you’ve probably heard of Aurelia by now. It’s a compelling competitor to frameworks like Angular and React. While getting started with Aurelia itself seems pretty straight forward, getting Aurelia working with Type-Script and making it all work Visual Studio 2015 has it’s own share of hiccups.
The aurelia team provides starter projects that they call skeletons that you can download and get up and running really quickly. However when I tried using them, the skeletons seemed to have issues which were both time-consuming and frustrating to resolve. Even the skeleton that was supposed to run with .NET MVC (and had a “.sln” solution file) would not even compile without errors. And these skeletons come with a lot more than what you would like have when you are just trying to get an initial hold of Aurelia and type-script. This left me with no other options but to star fresh and create my own basic skeleton where I can try out different Aurelia features.
If you’ve tried to get started with Aurelia + Typescript and you are a .NET programmer who lives inside Visual Studio, the goal of this post is to get you up and running with Aurelia and Typescript inside Visual Studio 2015.
To being with you’re going to need Typescript working inside your Visual Studio 2015. The simplest way I’ve found to do this is, just un-install older versions of Visual Studio 2015 and install Visual Studio 2015 Update 3 from scratch. You could use that link, but then if you have an MSDN subscription you are better of downloading an offline ISO from there and using that, which is what I did. Initially, I tried in place update of Visual Studio 2015, and the installer kept crashing for some reason (this of-course could be because of the fact that I was on a weak Wi-Fi). The MSDN ISO (a 7 GB download) worked smoothly after an uninstall of my existing visual studio; followed by a fresh install.
With Visual Studio 2015 Update 3 (with Core 1) loaded, you’re also going to need Typescript support inside Visual Studio so your Typescript files are compiled and converted to JS files each time you save them. To do that you can grab the Visual Studio Typescript plugin from here and install that. You will also need Node Package Manager (NPM) working on your machine and the simplest way to do that is download and get Node JS installed on your machine.
With that done we’re ready to start our first hello world project with Typescript + Aurelia.
As I said before, the easiest way to do this would have been to download and use the skeletons, but given that the skeleton’s provided by Aurelia team didn’t work for me; I was left with no option but to build my Aurelia app from hand and get started. Honestly, building your first app by hand actually works out better because it gets you a fresh new insight into many underlying concepts that you will typically not have to pickup if you use a ready made skeleton instead.
Since we’re going to be working with Visual Studio 2015 as our IDE of choice, let’s go and create a blank ASP.NET Web Development project inside Visual Studio in a folder of your choice. Open the solution file and keep the solution open in Visual Studio as you proceed with the below.
Once the project is created start command prompt and go to the specific location where you created the project. Note: go inside the project folder (not the folder with contains the .sln file – but the one that has your web.config file.):
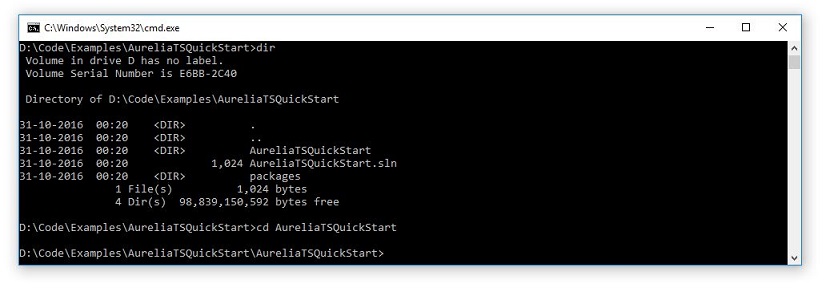
Once there start by typing in the following commands:
npm install jspm
jspm init
JSPM is the JavaScript Package Manager which let’s you fetch and use various Javascript modules you will need to get started with Aurelia. In the above diagram we switch to the project folder (shown in the screenshot + code snippet), do a NPM install of JSPM which fetches JSPM on your machine. Once there we initialize jspm in our project folder (jspm init) where it will create new project asking you basic questions:
![]()
We select the default answer by just hitting enter, except for picking the Transpiler, where we will use TypeScript instead of the default Transpiler JSPM uses (babel).
Once that is done we continue with rest of the defaults and finish our “jspm init”. We then install the required underlying frameworks in our project by doing:
jspm install aurelia-framework aurelia-bootstrapper bootstrap
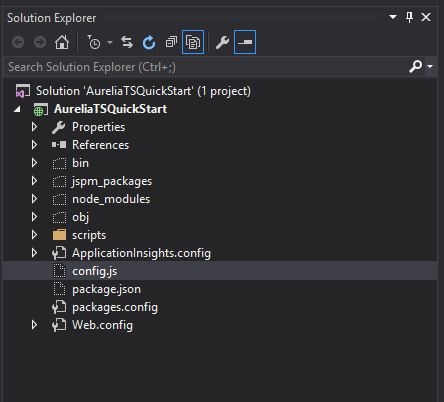
This should pull all files pertaining to Aurelia framework, the aurelia bootstrapper and the bootstrap framework (which are the very basic things we need to start a simple web application with Aurelia and Typescript). If all goes well your folder structure should look like this inside Visual Studio with “Show All Files” selected in Solution Explorer:
We now need to start writing code for our project. The first thing we do is right click the config.js file in the solution explorer and say “Include in Project”.
Once done we open the file and add the highlighted line :
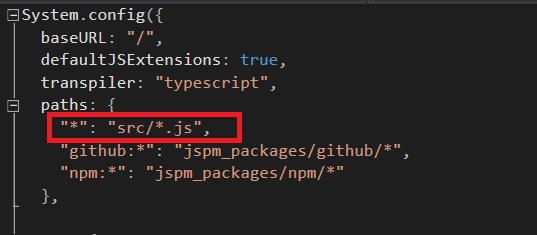
This tells the Transpiler to look for code in the “src” folder. Of course we don’t have that folder in our solution so we create that by right click solution explorer and clicking create folder and adding the src folder. Now we have a place where we will write our Aurelia code. But any web-server that we will also use to host the code will need a startup file to begin running the application – which usually is index.html. So let’s code the following index.html by hand:
Aurelia
aurelia-app>
This is a simple standard index.html file most Aurelia applications will typically need. We are adding two JS files that aurelia needs. The first is system.js and the second is where our configuration is stored (config.js). We then use System.import (from system.js) to import the aurelia-bootstrapper.
Also note the “aurelia-app” tag in body. A few important pieces are getting connected in the above code and aurelia is using convention to connect the pieces. The index.html tells aurelia to use the config.js file. And as we’ve seen before, the line we added in config.js tells aurelia that the custom aurelia code would be in the “src” folder. The “aurelia-app” tells aurelia to be default look for “app.js” as an entry point. Note: we haven’t specified app.js – but the aureila-app tag itself (by convention) tells aurelia to use app.js by default. You can of-course override the convention but that’s for another post. Right now, let’s just create a app.js in the source folder.
We could drop an app.js file inside source, but remember we are planning on using TypeScript throughout the project, so instead of an app.js, we will use “app.ts”. We will work on the typescript file (app.ts) and let Visual Studio to generate the .js fie each time we save the “.ts” file. So let’s right click “src” folder and add a Typescript file and call it “app.ts”. Because typescript provides added intelligence and compile time validations, it needs what we call typing files which allow visual studio to validate your TS code. Which is why Visual Studio will ask you this:
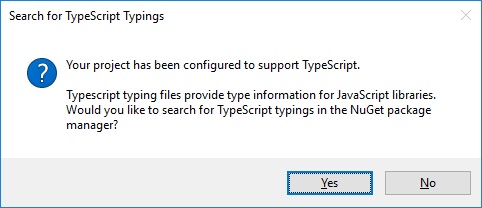
Going ahead we will grab out typing files manually so say no to the above for now and let’s proceed. We’re going to talk more about typings later in this post.
In your blank app.ts add the following lines:
export class App
{
    Message: string;

    constructor()
    {
        this.Message = 'Hello World';
    }
}
Note in the above code, we have a simple type-script class (this will translate to a JS function) and string Variable called Message. In the constructor we add a default value to the field. This app.ts, will get translated to app.js when we save it and will act as a view-model. Now that we have a “View Model” let’s go ahead and make a View. Aurelia view are simple HTML pages surrounded by a template tag. So inside “src” folder let’s add a new app.html and add the following lines:
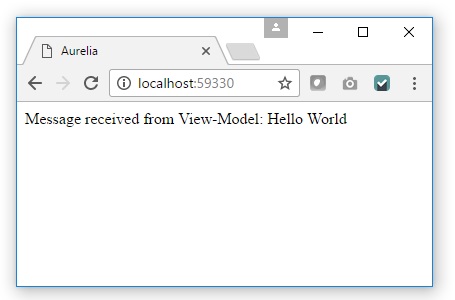
Message received from View-Model: ${Message}
The Message that we set in the View-Model should now flow to the view and when you compile and run the project at it’s root, you should now see:
Congratulations! You have your first Aurelia project with TypeScript running now. Now let’s do something more meaningful and try to create a screen to add customers to a List of Customers. To do that let’s start by making a Customer class by adding a “Customer.ts”. For now let’s modify the blank Customer Class so that it has a CustomerName attribute and looks like this:
export class Customer
{
    CustomerName: string;
    public constructor()
    {

    }
}
We will now need to go ahead and use the Customer inside app.ts and then create a function inside app.js that allows us to create a customer to the list of customers. To do that we modify our app.ts:
import { Customer } from './Customer';
export class App
{
    CurrentCustomer: Customer;
    Customers = new Array();

    constructor()
    {
    }
    addCustomer()
    {
        if (this.CurrentCustomer)
        {
            this.Customers.push(this.CurrentCustomer);
            this.CurrentCustomer = new Customer();
        }
    }
}
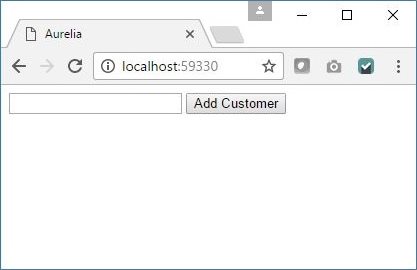
In the above code we use Import to import the Customer class into our App class so that we can use it in our code. Then we create an array of Customers (which will hold a list of customers) and a specific Customer (which the user will add using the UI). The “addCustomer” method adds the current customer to the list. To put sense into all of this let’s create a UI front end which has a textbox, and button called “Add Customer” which adds the customer whose name you type in the textbox to a List of customers which is re-presented by a “UL”. The final view (index.html) looks like this:
Notice that in the code above I have a form whose submit triggers the addCustomer method which we write in our View-Model. There is a textbox which we “bind” to the CustomerName of the Current Customer, which again is defined in our view model. We have a simple submit button and a UL where the LI’s repeat for every Customer in the “Customers” array which is defined in our ViewModel. The UI looks like this:
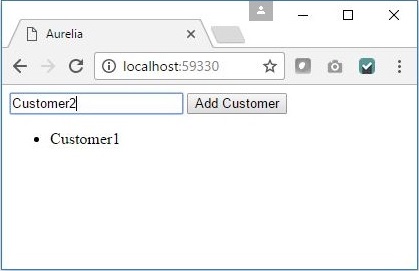
As we type the name of the customer and click the add button the customers get added to the list:
And we can do this with multiple customers:
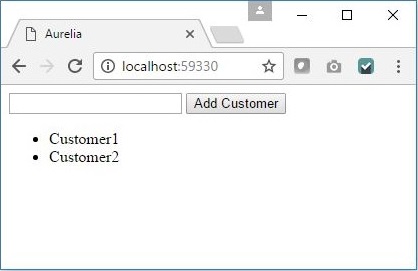
The binding of the textbox with the CurrentCustomer.CustomerName ensures that the value passes from the view to the view-model. Each Time addCustomer is called, we create a new Customer object and hence the textbox blanks out after the existing customer is added to “Customers” array which is bound to the UL using a “repeat.for” loop.
So far so good. Everything we’ve done thus far, compiles, builds and runs.
However as you start going into deeper Aurelia, you will realize that you will need to use more complex concepts like Dependency injection (where you would like to inject services into your view-models). The start project we have created works but isn’t fully ready to handle imports because we have the typing files missing. Remember we said we’ll discuss typings later in this post? This is the part where we now need to address typings to move ahead.
To virtually use any advanced feature in aurelia you will have to import the aurelia framework in your code. For example if you want to use the dependency injection of aurelia, your code to do so would look like this:
import { inject } from 'aurelia-framework';
Put that code in your app.ts and you’ll immediately realize that visual studio starts complaining:
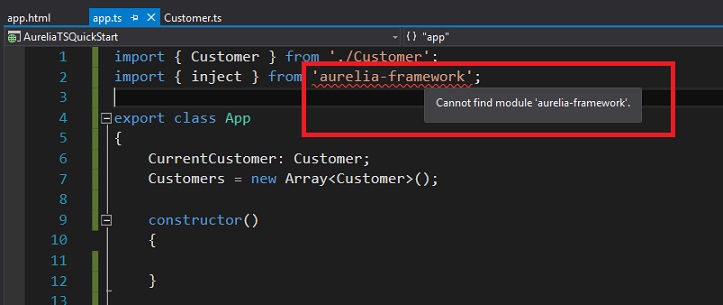
And this is because Visual Studio knows nothing about the Aurelia-framework even though we had done a “jspm install aurelia-framework” right when we started. We had done the install with the command prompt using jspm but visual studio (and typescript) still require typing files for aurelia framework before they let you import specific components of the framework inside your TS files. The simplest way to grab Typing files is to add a “typings.json” file in your project root and add the following lines to it:
{
  "name": "AureliaHelloWorld",
  "dependencies": {
    "aurelia-binding": "github:aurelia/binding",
    "aurelia-bootstrapper": "github:aurelia/bootstrapper",
    "aurelia-dependency-injection": "github:aurelia/dependency-injection",
    "aurelia-event-aggregator": "github:aurelia/event-aggregator",
    "aurelia-fetch-client": "github:aurelia/fetch-client",
    "aurelia-framework": "github:aurelia/framework",
    "aurelia-history": "github:aurelia/history",
    "aurelia-history-browser": "github:aurelia/history-browser",
    "aurelia-loader": "github:aurelia/loader",
    "aurelia-logging": "github:aurelia/logging",
    "aurelia-logging-console": "github:aurelia/logging-console",
    "aurelia-metadata": "github:aurelia/metadata",
    "aurelia-pal": "github:aurelia/pal",
    "aurelia-pal-browser": "github:aurelia/pal-browser",
    "aurelia-path": "github:aurelia/path",
    "aurelia-polyfills": "github:aurelia/polyfills",
    "aurelia-route-recognizer": "github:aurelia/route-recognizer",
    "aurelia-router": "github:aurelia/router",
    "aurelia-task-queue": "github:aurelia/task-queue",
    "aurelia-templating": "github:aurelia/templating",
    "aurelia-templating-binding": "github:aurelia/templating-binding",
    "aurelia-templating-resources": "github:aurelia/templating-resources",
    "aurelia-templating-router": "github:aurelia/templating-router"
  },
  "globalDevDependencies": {
    "angular-protractor": "registry:dt/angular-protractor#1.5.0+20160425143459",
    "aurelia-protractor": "github:aurelia/typings/dist/aurelia-protractor.d.ts",
    "jasmine": "registry:dt/jasmine#2.2.0+20160505161446",
    "selenium-webdriver": "registry:dt/selenium-webdriver#2.44.0+20160317120654"
  },
  "globalDependencies": {
    "url":
    "github:aurelia/fetch-client/doc/url.d.ts#bbe0777ef710d889a05759a65fa2c9c3865fc618",
    "whatwg-fetch": "registry:dt/whatwg-fetch#0.0.0+20160524142046"
  }
}
This will provide details of practically all aurelia typing files we are going to need for now and future. Once you have created this file and saved it go to command prompt, navigate to the folder that has the typings.json file (i.e. same folder as the one which holds your web.config) and type:
npm install typings –g
This will install the typings module globally. Now to grab relevant typing files based on your typings.json type:
typings install
Now we’ve fetched typing files but Visual Studio is still blissfully unaware about the fact that we’ve pulled the typings. You should also see the “typings” folder in your source explorer. However To make Visual Studio aware of the typings, we will need to add a typing definition file inside our source folder – the one which our Transpiler is watching. We can call this file anything as long as it has a “d.ts” extension but for now we’ll call “main.d.ts” and will place it inside the src folder. If you notice inside the typings folder you realize that is already has a typing definition file called “index.d.ts” – and it references all the necessary aurelia files; so if our “main.d.ts” just references that file we should be done. Let’s go to our newly created blank “main.d.ts” (inside the src folder) and add this line:
///
With this done we now have the typings referenced properly and visual studio should stop throwing “cannot find module ‘aurelia-framework’.” error and that specific error should get fixed. However now when you fire a build you should see dozens of these two errors:
Build:Cannot find name 'Promise'.
Build:Cannot find name 'Map'.
This is because Aurelia typings internally use promise and collections. To fix this error we can use the Nuget package manager inside visual studio and install Typescript definition for ES6 promise and collections. The command to do that (inside Visual Studio Nu-get package manager) is:
Install-Package es6-promise.TypeScript.DefinitelyTyped
Install-Package es6-collections.TypeScript.DefinitelyTyped
Once you do that and once typings for promise and collections are installed your build should compile successfully. However, if you start using advanced features like dependency injection you will encounter some more build errors. For example, let’s modify your “app.ts” to use dependency injection:
import { Customer } from './Customer';
import { inject } from 'aurelia-framework';@inject(Customer)
export class App
{
CurrentCustomer: Customer;
Customers = new Array();
constructor(injectedcustomer)
{
}addCustomer()
{
if (this.CurrentCustomer)
{
this.Customers.push(this.CurrentCustomer);
this.CurrentCustomer = new Customer();
}
}
}
Notice the lines in bold which are using out of the box dependency injection of aurelia. In other words, aurelia automatically creates an object of Customer class and pushes it in the constructor. However the moment you actually do this and hit a build you should see compilation error:
Build:Experimental support for decorators is a feature that is subject
to change in a future release.
Set the 'experimentalDecorators' option to remove this warning.
To Overcome this error you will need add a new tsconfig.json in your project root and add the following lines to it:
{
"compilerOptions": {
"noImplicitAny": false,
"noEmitOnError": true,
"removeComments": false,
"sourceMap": true,
"target": "es5",
"experimentalDecorators": true
},
"exclude": [
"node_modules","jspm_packages"]
}
The experimentalDecorators value of true ensures decorators like inject are allowed. Exclude on node_modules and jspm_packages ensures that the typescript compiler excludes those when it fires a build. Fire a build now and your build should fire successfully. Run your code and it should just as before because we aren’t doing anything in particular with dependency injection here. In fact it’s actually a bad example of dependency injection but I included it in this post because the post covers the setup of a starter project that let’s you try out and learn everything that aurelia has to offer while using it with Typescript, inside Visual Studio 2015, so adding a right “tsconfig.json” and getting the typings upfront is a good idea (even if you are not using dependency injection or other advanced aurelia concepts).
I honestly believe that while the aurelia team is doing an amazing job documentation and videos of aurelia itself, but mixing aurelia with type-script and getting it all to run on visual studio 2015 can turn out to be a bit daunting for someone who is starting out his aurelia + typescript journey because there is no single place to get started. It would be really nice to not have to go through so many steps to just set up a basic development project where you can try out and learn features aurelia (with Typescript) has to offer, while working inside visual studio.
I know you can create projects using Aurelia CLI tools but even those had the similar typings related issues that I highlighted in this post. And getting those to work was an equally daunting task. Now that I have been working in aurelia for a few days, I can take a skeleton and make that work too, but as far as I am concerned, the learning curve to get into aurelia itself has been much lower than the learning curve required to get into aurelia with typescript and get it all to work inside visual studio. All I can do is hope that the Aurelia team builds some more documentation around getting started with Aurelia + Typescript. In the meantime, this post you get you on your way.
You just made my day! I was just about giving up my Aurelia evaluation due to the non working vs templates and tutorials, but this was going almost flawless! I did it in vs17 indeed, for a forms.net project and there was only one glitch:
I had to also install this:
jspm install aurelia-pal-browser
Thanks again!
jspm install aurelia-pal-browser
And also there seemed to be some problem with typings. After going through the steps, I had to replace your typings.json with the below, delete the typings folder, and run typings install again. Then it worked.
My typings.json:
{
"name": "aurelia-skeleton-navigation-typescript-aspnetcore",
"dependencies": {
"aurelia-binding": "github:aurelia/binding",
"aurelia-bootstrapper": "github:aurelia/bootstrapper",
"aurelia-dependency-injection": "github:aurelia/dependency-injection",
"aurelia-dialog": "github:aurelia/dialog",
"aurelia-event-aggregator": "github:aurelia/event-aggregator",
"aurelia-fetch-client": "github:aurelia/fetch-client",
"aurelia-framework": "github:aurelia/framework",
"aurelia-history": "github:aurelia/history",
"aurelia-history-browser": "github:aurelia/history-browser",
"aurelia-loader": "github:aurelia/loader",
"aurelia-logging": "github:aurelia/logging",
"aurelia-logging-console": "github:aurelia/logging-console",
"aurelia-metadata": "github:aurelia/metadata",
"aurelia-pal": "github:aurelia/pal",
"aurelia-pal-browser": "github:aurelia/pal-browser",
"aurelia-path": "github:aurelia/path",
"aurelia-polyfills": "github:aurelia/polyfills",
"aurelia-route-recognizer": "github:aurelia/route-recognizer",
"aurelia-router": "github:aurelia/router",
"aurelia-task-queue": "github:aurelia/task-queue",
"aurelia-templating": "github:aurelia/templating",
"aurelia-templating-binding": "github:aurelia/templating-binding",
"aurelia-templating-resources": "github:aurelia/templating-resources",
"aurelia-templating-router": "github:aurelia/templating-router"
},
"globalDependencies": {
"jquery": "registry:dt/jquery#1.10.0+20170310222111",
"kendo-ui": "registry:dt/kendo-ui#2016.1.314+20160518063453",
"signalr": "registry:dt/signalr"
}
}
Comments are closed.